Hopping By to Say...

Creating a card for Craft Roulette episode 315 was a thrill—equal parts challenge, creativity, and “let’s see what happens!” In this post, I’m taking you behind the scenes of the creative process, with photos and insights from each step along the way. Whether you’re a seasoned crafter or just love seeing how something starts as a blank canvas and turns into a finished card, you’ll get an up‑close look at the fun, the problem-solving, and the magic that brought this card to life.
Please note: This blog post uses affiliate links when possible, whether mine or a friend's (because I love to help them out), and if you use our links, we will become vastly wealthy and will live a life of luxury for the remainder of our days... Just kidding! 😂 But I will be incredibly grateful to you for supporting my online content, and I am happy to say doing so is at absolutely zero cost to you. Plus it lets the crafty companies I work with know that their investment in me is worth it because I love (and actually use) their products! No pressure either way, friends! 💖
Step 1: Parameter Paralysis
The first step in creating my Craft Roulette card is always reminding myself that ALL PARAMETERS ARE DOABLE!! At the reveal of the parameters, we may feel a sort of crafty paralysis--that "oh no, I have ZERO idea how to make this work" feeling; and I suppose it's true, some parameters may be a little easier to accomplish than others. That's why it's important to remember: all parameters are doable. I promise. I pinky promise. I Purple Pinky Promise! #IYKYK 😉 It may just take some creative thinking--and hey, funny story, we're all super creative so this should be cake! 🎉
Last week's parameters for Episode #315 featuring Donna Mack from Purple Pinky Promises were:

Surprisingly, unlike most weeks where "parameter paralysis" strikes for at least a few seconds, this week the idea hopped (pun intended!) into my head fully formed! Well, nearly fully formed. What I consider the best part of the design was a happy after thought. Read on for the deets!
For materials, I gathered:
Neenah Classic Crest 110# Cardstock in the color Solar White (Amazon)
Copic Markers in various shades from the E, R, and Y families
Altenew Caps Bold Alphabet Die Set (SBC) or (Altenew)
Altenew foam tape
Distress Oxide Inks in Salty Ocean, Cracked Pistachio, and Mowed Lawn (SBC)
Rose Quartz MISTI (SBC) -- Color isn't required--I'm just extra like that! 😜
Low Tack Adhesive 1" Mint Tape (SBC)
Having a clear idea of the materials helped me stay focused and organized throughout the process.
I Love Big Words and I Cannot Lie!
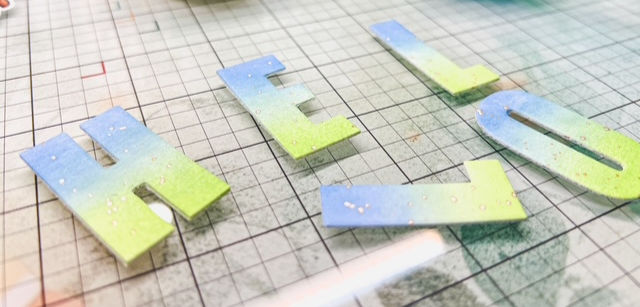
The "Big Letter(s)" parameter was SO right up my alley! I have said it a bazillion times, but I love, love, LOVE big sentiments! I find them so easy to work into my designs because they take up just enough real estate to be a fabulous focal point, and they leave just enough space for embellishments or additions to create a cohesive design. Plus...and this may come as a shock to some of you...I LOVE WORDS! 😂 #WordNerd There are some fabulous large word die sets out there, but for this project, I knew I wanted large, individual letters so that I could work some magic in and around the letters. This is where my go-to large alpha die collection from Altenew (Caps Bold Alphabet Die Set) came in clutch! But first, I needed to add some color. One of my favorite tricks for adding color and interest to large sentiments is to simply add an ombre of color to my white cardstock and then die cut my letters from it. Easy peasy die cut squeezy! For my color I used Tim Holtz Distress Oxides in Mowed Lawn, Cracked Pistachio, and Salty Ocean. I started with my center color first and then enhanced it with the other two colors on either end.

When I was happy with the ombre I achieved, I proceeded to cut out my H-E-L-L-O in multiple layers of white and then the final layer from my ombre piece. I did that to give the ink a few minutes to dry. Once I was done inking and cutting, I felt like there was something missing, so I gave it a good think. Then it dawned on me--gold! It needed some gold spatter, so I grabbed whatever was closest, my Brutus Monroe Metallic Aqua Pigment in Gilded, and went to town shining up those letters! You can see the spatter much better in the photo below, and trust me--in person? Shine for dayyyyyys!
Coloring my Critters
The next task at hand was coloring my critters! I have not used my Lawn Fawn sets in a while (too long, really), and I thought this would be the perfect week for a number of reasons--1) I had not yet used this Kanga-rrific set; 2) the LF critters tend to be small, so they would fit really well alongside my large sentiment, and 3) the Craft Roulette project needed some type of hop! Well, I'd say kangaroos fit the bill quite hoppily, wouldn't you? 😉

I brought in a number of Copic Markers in various shades and tones of the E family, some leaning more red, some leaning more brown, and I added a touch of yellow to brighten up my butterflies. I also colored a bunch of trees and grass, but as you can see in the final project, I didn't end up using them this time. That can feel disheartening, I know, to spend so much time carefully coloring, shading, layering, laboring, etc., to end up not using what you painstakingly worked on--BUT, that's a key tip for designing. Edit. Edit. Edit. It's hard to put down something you love and spent so much time perfecting, but you don't have to toss it! Just keep it for the next project that will really let it have its moment. Don't force your project to fit your elements, let your elements shape and enhance your project. ❤️
When Your Tools Don't Match Your Plan

So after coloring all my cuties and adding sweet little white highlights to them with my gel pen, it was time to die cut them all out...except, oh no, where are my DIES?! I originally got this Kanga-rrific set during a virtual craft retreat with Jenn Shurkus, and shortly after the class I purchased the die set and the add-on stamp and die set...or so I thought! The good news is I DID have the die set for the main kangaroos, but apparently I did NOT have the die set for the add-on! Ooooops! Ok, so I know I'm about to use a crafty swear word, and I hope you will all forgive me, but it was time to *whispers* fussy cut. I know, I know, I feel you cringing from here, BUT--this is a good time to bring up what I have realized over the past few years of crafting: Fussy cutting is only as bad as your scissors! If you use good scissors, the task is easy, even (dare I say it?) enjoyable! I have two pairs of go-to scissors, and for this project I used my awesome Uniquely Creative Fussy Cutting Scissors that I picked up from InkyStamper. Although the cutting blades are sharp and pointed so they easily work their way around the tight curves for fussy cutting, the handles are a great, larger shape that fit my man hands! lol They even work great for lefties! Anyway, all that to say, I was able to fussy cut a couple of my shapes quickly and painlessly for my design. 🎉
Hopping By to Say...

So here's where things got extra FUNN! I already mentioned how I love big words, but I also love pairing them with teeny sentiments that just set them off nicely. In this case, I used "Hopping by to say..." in a small font so that the "HELLO" would have a meaningful impact as the card's focal point. I tossed around ideas on where to place it, but I tend to look for a place where the sentiment can naturally nestle, perhaps between two letters, maybe underneath a critter, something like that. In this case, I realized that it looked best along the straight edge of the L-L-O, but it still wasn't doing it for me. I looked over the set, and that's when it hit me! The ellipses in the sentiment are a perfect match for the "boingy" action stamps that are (at least in my mind) synonymous with Lawn Fawn critter stamp sets! They always have the best action or motion indicator stamps, like what you see in the example set to the side. Problem was I couldn't figure out how to use the stamp without it taking up too much space.

Creativity to the rescue! I'm often a little unhinged (LOL), so I just leaned fully into that and decided my sentiment could be a little unhinged, too! I imagined that my little kangaroo was using the letter E as his springboard to get to his little buddy hanging out over at the letter O, but his bounce had a little more force than expected, and he knocked it right off its hinge! Truly, friends, this card has become one of my favorite so far this year. I just love its whimsical nature, and how it doesn't take itself too seriously! Much like me. I'm silly and so are my cards, but hopefully in a good way! 😄
Finishing Touches

To complete the card, I added a soft yellow ink blend to the background behind the letters, added some strategically placed butterfly friends for a pop of color, and then got to popping up all the things! Like Cathy Zielske, I, too, am an over-adheser, as you can see here. If there is open space, you better believe I'm adding foam tape! It's kind of a problem... LOL! One tip I like to share is using different thicknesses of foam tape so that your project has more visual interest, but also because it helps you ground your elements in a more natural way. For example, I used low loft foam squares on my HELLO sentiment, and I used standard loft for my kangaroos. That meant that my kangaroos would sit more naturally over the lip of the letters, and not be tilting at a wonky angle. Once all my elements were glued on, I debated whether to add embellishments, but honestly? I thought the little butterflies were the perfect embellishment all on their own! So then I was good to go!
What do you think of the finished project?? Have you ever tried using really large sentiments as your focal point?
I'd love to hear your thoughts in the comments below!!
Finished card project Upright angle Finished card project
Final Thoughts
As often happens, this Craft Roulette episode pushed me to experiment with new techniques and materials, and had me reaching for a neglected stamp set, which is always a plus! The result is a card that feels personal, whimsical, creative, and oh so much FUNN! I hope sharing my step-by-step journey inspires you to try something new in your crafting.
Thanks so much for going on this journey with me, friend! See you next time! <3


Comments